how to make bias binding

Sunday, February 28, 2010

I'm into my Japanese pattern books again, thinking about things to make for spring and summer. I'm loving all these cute items with bias binding and ties.


But everyone knows bias binding is a pain to make perfectly, right? I've been visiting with my friends over at Hayes Sewing Machine Co. again and have some tips to try for perfecting the look of bias binding at home.

Supplies you will need to make bias tape:
-generous piece of fabric, depending on how much tape you are making (sorry, bias cuts take a lot and waste a lot of fabric unless you seam it to death)
-see through ruler ( I like 2" by 18" size)
-bias tape maker
-rotary cutter
- iron
-bias binding foot (see what is available for your machine)

Step one in making bias tape and binding is to cut strips of  fabric on the bias and seam them if necessary.  Bias just means a 45 degree angle to the grain or selvedge.
You can find the angle by folding up the bottom corner of your piece of fabric to meet the perpendicular edge. It's easy to get exact on a check or stripe. Truthfully, it won't matter much if your off by a few degrees.
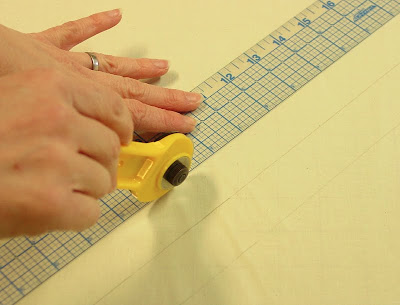
The best way to cut even, accurate strips is to use a see-through ruler and a rotary cutter. To get a long piece, you may need to seam your strips. It looks like this:
I've read the directions that came with my 3/4" bias tape maker and it says for regular cotton fabric, I need to cut 1 3/8" strips to wind up with 3/4" tape and 3/8" binding.

This nifty low tech bias tape maker  is my new friend. It comes in different widths for your various projects.
You cut the start of your bias into a point and feed your bias strips through (I'm nudging in with a needle through the slot to get it started) and it comes out the other end, evenly folded and ready to iron.
Feed an inch or two of your strip through the little contraption at a time and hit it with the iron as it comes out the other end. It is so superior to trying to hand fold the strips yourself  that I can't even stress enough how essential it is to get one of these! There is also a pricier high tech bias tape maker that does the ironing part for you too, which looks intriguing if you will be making a lot of tape.

If you want to make a boatload of tape, for binding the edge of a quilt, for instance, here is a formula with directions for making and seaming many yards of bias.
Now I've got this lovely, perfectly even piece of bias tape and I want to apply it to the armhole of my trial sundress. I fold it in half again and iron  it. I apologize for the boring fabric, but I am trying this out for the first time and don't want to risk the good stuff.
At the sewing store, I watched a demo of applying bias binding with a special bias binder foot and succumbed to buying one for my Babylock. It's supposed keep your binding folded and aligned, top and bottom by way of a plastic guide not unlike the bias tape maker. You feed it through the guide and line up your needle position where you want it, so both sides of the binding are caught in the stitching. It looked so easy when Pam Hayes did it. Hmmm, we'll see....
It's not so easy to get the first bit started so I thought of a workaround. I attached some threads to the beginning to have something to help pull it through before the feed dogs can grab it and take over.
This is going swimmingly!
The part where you sandwich the body fabric of the dress into the binding is a little harder. There is a slotin the foot to tuck the body fabric into but it can still shift and come out. You just have to be vigilant and keep a needle handy for poking it back into place. Starting over midway is not an option. Mess up, and you have to rip it all out and start over.
 
I'm happy with the result, though. It really does look professional!

in love with vintage tablecloths

Wednesday, February 17, 2010

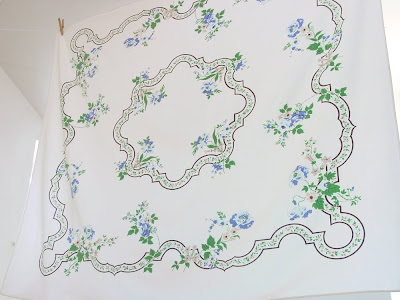
I'm blaming the snowstorms. Stuck indoors for the week, I did some damage to the wallet & the waistline. I spent too much time in front of the computer, bidding on vintage textiles on Ebay and stuffing my face with girl scout cookies. I guess I really want it to be spring, because I bought ten springy-looking vintage tablecloths from the '40's & '50's, among other things. These are the first arrivals...
You definitely have to make a leap of faith buying on Ebay. Most of the sellers have terrible pictures and you have to hope for the best and rely heavily on the written descriptions. I wasn't sure about this one, but in person it is gorgeous!
This one had good pictures and a lot more bids because of it. Had to have it though. With some strategic cutting, this would make a sweet Easter dress.
I broke the rules on this one. You're not supposed to bid with your emotions, because you'll wind up overpaying. This cloth was closed up in this lady's hope chest since her wedding 50 years ago. The dogwood motif grabbed me because I'm from Virginia and it's our state flower. I'm thinking of cutting it up into a bias-cut skirt for myself if I can bring myself to. Actually, I'll be cutting all of these up into dresses and skirts for the shop.
This one's growing on me. I wasn't in love with it once it arrived, being more high-contrast than the others, but it's growing on me.
I think I was the only bidder on this one because the picture was so bad. I love it in person, though. So very 1949, charmingly faded, but stain-free! Etsy sellers do a much better job overall at photographing and presenting their items than Ebayers do.
This one says summer picnic to me. It's tiny, though. I was a little in shock when I unfolded it, but the measurements were fully disclosed at 30" x 31". That wouldn't even cover the top of a card table. It'll have to be made into something very very small!
Spring is really coming! See?

mexican hot chocolate

Saturday, February 13, 2010

Here we are, newly dug out from the second blizzard this week with news of another storm on the way for the beginning of next week. School has been canceled the entire week and sledding is no longer a novelty. This is highly unusual for Delaware! Some years we get an inch or two for the season.
So what are you supposed to do while stuck  home with stir-crazy kids? DRINK of course! But at least be seasonal about it. This hot chocolate recipe was a hit with my superintendant-of-schools-cursing gal pals and goes really well with any kind of cookie...

Mexican Hot Chocolate
adapted from a recipe by Rachael Ray
4 cups whole milk
1 cup water
8 ounces semisweet chocolate chips (2/3 of a package)
2 tablespoons sugar
2 teaspoons vanilla extract
1/2 teaspoon chile powder (trust me)
1/4 teaspoon cinnamon
pinch salt
Kahlua to taste- anything from a tablespoon per cup, on up

Mix all the ingredients together except for the Kahlua in a large saucepan. Whisk constantly over medium heat until hot, but not boiling. Will fill 4 large mugs or 8 small. Add Kahlua to individual mugs as desired! You can even use cinnamon sticks as stirrers if you want to get fancy.

Happy Valentine's Day!

seconhand (pepe)

Tuesday, February 9, 2010

I don't remember what I googled to come across this 2007 indie documentary, Secondhand (Pepe) by Vanessa Bertozzi & Hanna Rose Shell, about the history of the rag trade and what happens to the clothes we so righteously donate to Goodwill. I've been spending a lot of time lately trolling my local charity shops for dress shirts and other clothing with interesting patterns to rework into skirts & dresses, so when I stumbled upon this trailer for the film, I was intrigued. I had to buy the full 24 minute version from Vanessa Bertozzi's Etsy store.
photo by HannaRose Shell
Most of the clothing we donate to Goodwill, etc does not actually sell through the stores. The best stuff gets sorted out to sell here in the USA, which I am glad to partake of at $3.50 per shirt, but the rest gets bought by exporters for pennies per pound (3 cents even!) who bale it up and send it to third world countries where it is resold to dealers for a few pennies more per pound, then sold again to shops and peddlers for a few pennies more and so on. Americans buy clothes with a disposable mindset that creates a constant flow of cast-offs in search of a market. It certainly isn't given away like you might expect. George Packer writes in his 2002 NY Times magazine article on the subject: "A long chain of charity and commerce binds the world's richest and poorest people in accidental intimacy." That chain makes some interesting twists and turns.
photo by HannaRose Shell
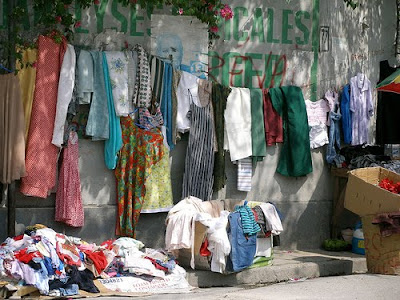
Bertozzi & Shell were inspired by the Packer article to delve into this almost hush-hush industry. In their film they meld archival footage of Jewish rag peddlers from Eastern Europe who migrated to the US in the early 20th century with new imagery of the seconhand clothing trade in Haiti. Exerpts from the memoir of a rag peddler are read by his grandson and artfully interwoven with sound bytes from a Hatian-American radio show asking callers "What is pepe?" In this poorest country in the western hemisphere, new clothing is almost unheard of. The boatloads of clothing and other seconhand articles that arrive constantly in Port Au Prince is referred to as "pepe", a slang term derived from the early peddlers calling out "paix! paix!" to calm the feeding frenzy over new arrivals. Other nicknames for it are "Kennedy", "Reagan", "Goodwill", or if it's an exceptionally good piece, "Hollywood pepe".

After the pepe arrives, it gets sorted, filtered and redistributed through an intricate network of entrepreneurs, peddlers, and seamstresses. Even stained or torn goods, can find use as rags upholstery stuffing, or even patchwork art as shown here from Vanessa Bertozzi's flickr set.
 photo by Vanessa Bertozzi
Upcycling at it's vibrant best.
  photo by Vanessa Bertozzi
What is interesting to me is how creativity can arise out of need. Hatians are very resourceful at re-purposing and resusing. They have to be- nothing is new here. There are no chain stores.
 
photo by Vanessa Bertozzi
Believe it or not, old-style foot-pedal sewing machines are preferred in Haiti because of the frequent power outages.
photo by Vanessa Bertozzi
This seamstress, struggling to sell her new designs, explains how her own shirt is pepe with shaping added through darts and sleeves modified from long to short. It's a love-hate relationship. The pepe is irresistible because of the cheap price of it, yet it beats out any local apparel industry except as it relates to modifying the pepe. It brings to mind our American addiction to cheap products from big box stores and how it has squelched our own local industries.
photo by HannaRose Shell
I just like this interior, likely filled with pepe, from Hanna Rose Shell's flickr set. It looks like something out of the beloved, defunct Domino Magazine.

These images are all of Haiti in better times. It's hard to imagine this poor country enduring earthquake devastation on top of it all. Go here if you are interested in contributing to Habitat for Humanity's resconstuction efforts in Haiti.

how to applique a t-shirt

Tuesday, February 2, 2010

Before opening chirp & bloom, I'd never appliqued on knit before. I really wanted something to go with my patchwork skirts, though, so I decided to give it a whirl. There was definitely some trial and error involved. While waiting for my pristine new t-shirts from American Apparel to arrive, I experimented on some old t-shirts from the rag bag. It was worth it, because I figured out only one stabilizer out of the many out there was suitable and I got lots of practice pivoting around tight corners & curves..

Here is what you will need to applique a t-shirt:
-t-shirt
-2 copies of your motif (with pieces numbered if it's complicated)
-fabric scraps for the motif
-Heat N Bond Lite iron on adhesive
-iron
-fiberglass ironing sheet (or you can get away with an ordinary press cloth too)
-Sulky Tear-Easy stabilizer
-thread- shiny embroidery thread if desired
-sewing machine
-Pellon Easy Knit fusible interfacing

I recommend pinning a copy of your motif to your garment first to double check it for placement and scale. Try it on. Look in the mirror. I was way off on my original idea for the scale and wound up increasing it quite a bit to look intentionally oversized.
Apply some Heat N Bond Lite to the wrong side of your fabric scraps. The "lite" version is plenty strong enough for the t-shirt and most other things. Peel off the backing. Using one of your copies as a pattern, cut your motif out of your adhesive-backed fabric scraps. I decided to do a batch of shirts at once, so layered up two at a time to save on some cutting time.
Using the other copy of your motif as a key, lay your pieces on the right side of the t-shirt. Iron on using a hot iron and a press cloth so you don't scorch your shirt. I love my fiberglass ironing sheet for this.
Once your motif is adhered to the shirt, you need to pin a square of stabilizer to the back side before stitching. Stabilizer is absolutely necessary especially on knits and lightweight fabrics. It is a non woven material a lot like interfacing that you put behind your motif while machine stitching around it's edges or adding stitched details. If you don't use it, your stitches and fabric will bunch up. The first one I tried was very stiff and too difficult to tear off. You want to be able to tear it completely off the back when you're done so yo don't wind up with a boardy patch-like feeling to your motif. Then I read somewhere that the self-adhesive type was the way to go with knits. Nope- when I tried it, it was so sticky, I couldn't get it all off. The one that worked best for the t-shirts was Sulky Tear-Easy. It is lightweight and very tearable. It gave enough support just pinned on at 4 corners behind my motif.

Now you're ready to do the applique stitching. There are a lot of different machine stitches that will work. I like a blanket stitch because it looks hand-done. I like zig-zag too. Satin stitch (zig-zag with a short stitch length) looks like what a factory would do. And there's always plain straight stitching if you want is to look clean & simple. There are many choices of thread too- shiny, regular, variegated. Always experiment on a scrap first. Pivoting around curves an corners is tricky (only pivot with needle down), so practicing first is key. While you're stitching, be careful not to catch more than just the outside layer of the shirt in the stitching. Machines with a free arm are great for this, but I don't have that, so I have to be careful and smush my fabric around just so.
While sewing, I leave a decent length of thread at the start & stop. I don't like to just trim them off because I'm afraid the stitches will unravel. I use a sewing needle and sew all the ends through to the back and knot them with the other loose threads before trimming them off. It's an extra step that a factory wouldn't do, but it makes a more durable piece.
And of course all that stabilizer needs to come off. Inside the motifs, I get a rip started with a seam ripper, then yank. Hold your stitches down on the table and yank away from your fingers with a flick of the wrist- like the waxing lady at the salon does.
Almost done... as a finishing touch, iron on to the back side of the work a piece of Pellon Easy-Knit interfacing with the grain matched up to the grain of the shirt. Trim it to shape first so there is not too much excess around the edges, but the whole back side of the motif is covered. This will protect the stitches that you so painstakingly knotted off and make it nice and smooth next to the skin, especially for kids.
 
If this tutorial helped you, please send me a picture of your results!